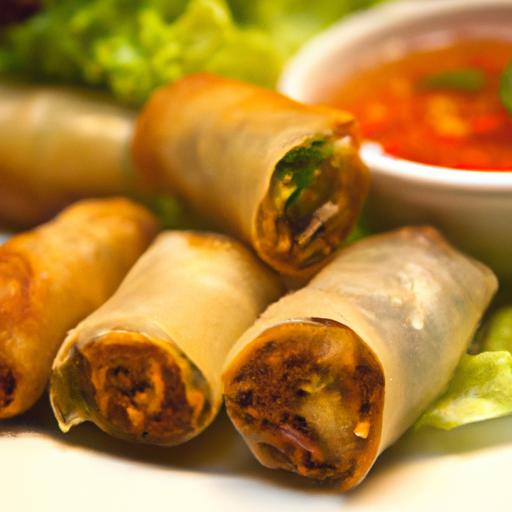
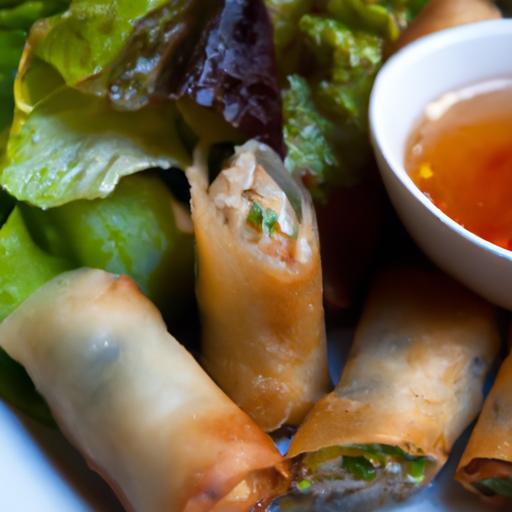
There’s something irresistibly satisfying about biting into a perfectly crispy vegetable spring roll-the delicate crunch giving way to a burst of vibrant, savory filling. While these golden delights are frequently enough associated with bustling street markets and bustling restaurant kitchens, mastering the art of crispy vegetable spring rolls at home is not only achievable but also immensely rewarding. In this article, we’ll unlock the secrets to creating these crunchy masterpieces from scratch, sharing tips on selecting fresh ingredients, crafting the ideal filling, and achieving that coveted crispiness without a hint of greasiness. Whether your a seasoned cook or a curious beginner, get ready to transform your kitchen into a spring roll haven and impress friends and family with every tasty bite.
Master the Art of Crispy Vegetable Spring Rolls at Home
Master the art of crispy vegetable spring rolls at home by selecting the best fresh vegetables and mastering techniques that bring out crunch and flavor in every bite. These delicate golden parcels hold a symphony of textures and tastes, each filling bursting with freshness, wrapped in a perfectly crisp shell that’s nothing short of addictive.Whether you’re a seasoned home cook or a curious food enthusiast, this guide will inspire you to create irresistible spring rolls that rival your favorite takeout.
Prep and Cook Time
- Readiness: 25 minutes
- Cooking: 15 minutes
- Total Time: 40 minutes
Yield
Makes approximately 12 spring rolls
Difficulty Level
Medium – Perfect for those agreeable with wrapping techniques and deep frying.
Ingredients
- 2 cups shredded napa cabbage
- 1 cup julienned carrots
- 1 cup finely sliced shiitake mushrooms
- ½ cup mung bean sprouts, rinsed and drained
- 3 cloves garlic, minced
- 2 green onions, finely chopped
- 1 tablespoon soy sauce
- 1 teaspoon toasted sesame oil
- ½ teaspoon freshly ground black pepper
- 12 spring roll wrappers (fresh or thawed if frozen)
- 1 cup all-purpose flour mixed with 1 cup water (for sealing wrappers)
- Vegetable oil or peanut oil for frying (see tips below)
Instructions
- Prepare the filling: Heat a non-stick skillet over medium heat and add a teaspoon of neutral oil. Sauté minced garlic until fragrant, about 30 seconds. Add the shredded napa cabbage, carrots, shiitake mushrooms, and bean sprouts. Cook, stirring frequently, until vegetables soften slightly but retain crunch, about 4-5 minutes. Stir in soy sauce, toasted sesame oil, and pepper. Remove from heat and let cool.
- Set up your rolling station: Arrange your spring roll wrappers on a clean surface. Have your flour and water paste nearby in a small bowl for sealing edges.
- Wrap the rolls: Place one spring roll wrapper with a corner pointing toward you (diamond shape).Spoon roughly 2 tablespoons of filling near the bottom corner. Fold bottom corner over filling, then fold left and right corners inward firmly. Roll upward tightly. Brush a thin layer of flour paste along the top corner to seal the roll entirely.
- Heat the oil: In a deep frying pan or wok, pour enough vegetable or peanut oil to submerge the rolls (about 2 inches deep). Heat oil to 350°F (175°C). Use a thermometer for best results to maintain steady heat and avoid greasy rolls.
- Fry to crispy perfection: Carefully lower 3-4 spring rolls into the hot oil without crowding. Fry for 3-4 minutes, turning occasionally until a beatiful golden brown crust forms. Remove with a slotted spoon and drain on paper towels. Repeat with remaining rolls.
Chef’s notes and Tips for Success
- Choosing the right vegetables: Look for fresh, crisp vegetables – napa cabbage, carrots, and mushrooms each play a vital role in balance. Avoid watery veggies to prevent sogginess.
- Mastering the wrapping: Tension during rolling is key: wrap snugly but gently to avoid tearing the delicate wrapper or overstuffing.
- Oil selection is critical: Use oils with high smoke points like vegetable, canola, or peanut oil. Peanut oil lends a subtle, complementary flavor and maintains crispiness.
- Maintaining oil temperature: Avoid overheating to prevent burnt rolls or dropping temperature too low to keep the rolls from absorbing oil and becoming greasy.
- Make ahead: Fill and wrap spring rolls up to 4 hours ahead. Keep them covered in the fridge on parchment to maintain freshness before frying.
- For allergy-conscious cooks: Replace soy sauce with tamari for gluten-free or a low-sodium alternative.
Serving Suggestions
Serve your crispy vegetable spring rolls hot, accompanied by a selection of dipping sauces such as sweet chili, soy-ginger dip, or a tangy peanut sauce.Garnish with freshly chopped cilantro, thinly sliced red chili, or toasted sesame seeds to add a pop of color and extra texture. Pair with a light Asian-inspired slaw or a cold cucumber salad for a refreshing complement to the richness of the rolls.

| Nutrient | Per Serving (2 spring rolls) |
|---|---|
| Calories | 190 kcal |
| Protein | 4 g |
| Carbohydrates | 24 g |
| Fat | 8 g |
For more on perfect Asian-inspired appetizers, explore our Perfect Vegetable Dumplings Recipe.
Learn about the science behind frying and oil selection at the Serious Eats Deep Frying Guide.
Q&A
Q&A: Master the Art of Crispy Vegetable Spring Rolls at Home
Q1: What’s the secret to achieving perfectly crispy vegetable spring rolls?
A1: The key lies in the balance of moisture and crispiness. use fresh, finely shredded vegetables and make sure to squeeze out excess water-especially from watery veggies like cabbage or mushrooms. This prevents sogginess. also, choose the right wrapper (rice paper or wheat-based spring roll skin) and fry at a precise medium-high temperature (around 350°F/175°C) to create an even, golden crunch without oil absorption.
Q2: Which vegetables work best for crunchy, flavorful spring rolls?
A2: A vibrant medley works wonders! Think shredded carrots, cabbage, bean sprouts, julienned bell peppers, green onions, and water chestnuts for extra crunch. You can toss in mushrooms like shiitake or oyster for umami, and fresh herbs like cilantro or mint add a refreshing burst.The key is to mix textures and colors for a spring roll that delights every bite.
Q3: Can I make these spring rolls ahead of time without losing their crispiness?
A3: Spring rolls are best enjoyed fresh out of the pan for that iconic crunch.However, you can prep the filling and wrap them in advance. If you need to store cooked rolls, place them on a wire rack to cool, then reheat briefly in a hot oven or air fryer to revive their crisp. Avoid microwaving, which can turn them soggy.
Q4: What’s the best oil to use for frying spring rolls at home?
A4: Choose an oil with a high smoke point and neutral flavor to avoid overpowering the delicate vegetable flavors.Canola, peanut, sunflower, or grapeseed oils are excellent choices. These oils stay stable at frying temperature and keep your kitchen aromas light and fresh.
Q5: How can I make my spring rolls both crispy and light, avoiding a greasy finish?
A5: Maintaining the right frying temperature is essential-too low, and the rolls soak up oil; too high, and they burn. Use a heavy-bottomed pan or wok to regulate heat evenly. Fry in small batches to keep oil temperature steady and drain rolls on paper towels after frying. For an even lighter alternative, try baking or air-frying, but remember, traditional shallow frying offers unmatched crispiness.Q6: Are there good dipping sauces to enhance vegetable spring rolls without overwhelming their freshness?
A6: Absolutely! Classic options include a tangy hoisin-peanut sauce, a vibrant sweet chili dip, or a simple soy-ginger-sesame blend. Freshness is key-adding lime juice, fresh garlic, or finely chopped herbs to your sauces complements the veggies without stealing the spotlight.
Q7: Can these crispy spring rolls be adapted for gluten-free diets?
A7: Yes! Use rice paper wrappers or certified gluten-free spring roll skins. Just remember, rice paper spring rolls are usually fresh and not fried, so for that crispy experience, look for gluten-free wheat-based wrappers or explore frying techniques with rice paper carefully-puckering the wrapper too much can cause tears.
Q8: How do I avoid spring rolls bursting during frying?
A8: Don’t overfill the rolls; a modest amount of filling will seal well without stress on the wrapper. Seal edges properly with a little water or a flour slurry to act as glue. Also, make sure filling isn’t too wet, and maintain stable oil temperature so the wrapper crisps quickly and seals without breaking.
Q9: Is it possible to bake vegetable spring rolls and still keep them crispy?
A9: Baking is a fantastic option for a lighter version! brush the rolls lightly with oil and place them on a wire rack in a preheated oven at 400°F (200°C). Turn halfway through baking for even crispness. While not quite as crunchy as frying, this method delivers a satisfyingly crisp texture with less oil.
Q10: What is a creative twist to elevate classic vegetable spring rolls at home?
A10: Amp up the layers of flavor by adding grilled or roasted vegetables like zucchini or eggplant, or even subtle spices like lemongrass and ginger in your filling. For a delightful surprise, include a small drizzle of hoisin or chili sauce inside before rolling. Pair with unexpected dips like a tangy tamarind sauce or a creamy avocado-cilantro dip to wow your taste buds!
Future Outlook
With these tips and techniques in your culinary toolkit, mastering the art of crispy vegetable spring rolls at home is well within your reach. Each golden, crunchy bite tells a story of fresh ingredients and careful preparation-transforming simple vegetables into a sensational appetizer that delights the senses. So roll up your sleeves, embrace the satisfying sizzle of the pan, and let your kitchen become a haven of crispy perfection. Soon enough, the art of spring rolls will no longer be a restaurant secret but your own flavorful signature. Happy rolling!