
In the world of Japanese cuisine, few dishes capture the essence of simplicity and tradition quite like onigiri. These humble rice balls, often wrapped in crisp nori and filled with savory treasures, have been a beloved staple in homes and convenience stores alike for centuries. mastering the art of onigiri is more than just learning a recipe-its an invitation to explore the delicate balance of texture, flavor, and technique that transforms everyday ingredients into a portable comfort food. Whether you’re a seasoned cook or a curious beginner, this step-by-step guide will unlock the secrets behind perfect onigiri, empowering you to create these iconic bites with confidence and creativity. Let’s roll up our sleeves and dive into the flavorful world of Japanese onigiri!
Mastering Japanese Onigiri is a rewarding culinary journey that connects you to a time-honored tradition of Japanese snacking. These charming rice balls, simple in appearance yet complex in comfort, are a staple that epitomizes home-style Japanese cooking. Growing up in a household where my mother handed down her secrets, I learned early on that the magic lies not just in the fillings but in selecting the perfect rice and seasoning to achieve that ideal balance of flavor and texture.
Prep and Cook Time
- Preparation: 20 minutes
- cooking: 25 minutes
- Total Time: 45 minutes
Yield
- Approximately 8 medium-sized onigiri
Difficulty Level
- Medium – perfect for those ready to elevate their rice shaping skills
Ingredients
- 2 cups Japanese short-grain rice, rinsed until water runs clear
- 2 1/4 cups water for cooking rice
- 2 tablespoons rice vinegar
- 1 tablespoon mirin (sweet rice wine alternative, optional)
- 1 teaspoon fine sea salt
- Nori sheets, cut into 2-inch wide strips for wrapping
- Plastic wrap or wet hands (to prevent sticking during shaping)
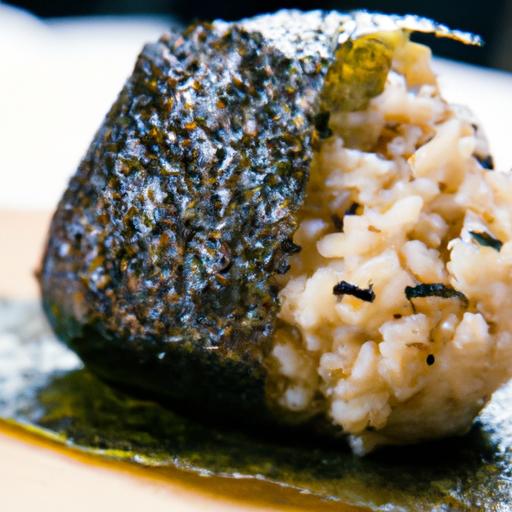
- Fillings of choice: pickled plum (umeboshi), cooked salmon flakes, or seasoned kombu seaweed
Instructions
- Cook the rice: Combine rinsed rice and water in a heavy-bottomed pot or rice cooker. bring to a boil than reduce to a low simmer, cover, and cook for 15 minutes. Remove from heat and let it steam, covered, for another 10 minutes to achieve the perfect fluffy texture.
- Season the rice: While the rice is warm but not hot, gently fold in rice vinegar, mirin (if using), and sea salt using a wooden spatula – this seasoning brings out subtle sweetness and shine.
- Prepare filling: Choose a filling that resonates with your palate; prepare small portions (about 1 tablespoon each) ready for stuffing.
- Shape the onigiri: With hands lightly moistened or covered in plastic wrap, scoop about half a cup of rice. Flatten the rice slightly, place the filling in the center, then cover with another layer of rice. Press firmly but gently into a triangular or oval shape, ensuring the filling is securely enclosed.
- Wrap the onigiri: Attach a strip of nori to one side of the rice ball for added texture and flavor. The seaweed sheet will crisp as it meets air, creating an inviting contrast to the soft rice.
- Serve or store: Onigiri is best enjoyed fresh but can be wrapped tightly in plastic wrap and refrigerated for up to 24 hours.
Tips for success
- Rice selection is crucial: Use only Japanese short-grain rice for its sticky yet tender qualities that hold the onigiri shape perfectly.
- Seasoning balance: Don’t over-vinegar the rice, subtlety is key for authentic taste.
- Hands or tool? Wet your hands or use plastic wrap to avoid rice sticking and keep the shapes clean.
- Filling variety: Experiment beyond customary fillings by trying spicy tuna (cooked), avocado and sesame, or even teriyaki chicken for a modern twist.
- Keep it cool: When storing,keep onigiri refrigerated but bring to room temperature before eating for the best texture.
Serving Suggestions
- Serve on a simple bamboo leaf or patterned plate to highlight the triangular shapes and contrasting nori wrap.
- Accompany your onigiri with a bowl of miso soup or a fresh cucumber salad for a balanced meal.
- Sprinkle toasted sesame seeds or furikake (Japanese rice seasoning) on the rice surface for added color and a savory kick.
- Include pickled vegetables such as takuan (yellow pickled daikon) on the side for authentic flavor contrast.
| Nutritional Info (per onigiri) | calories | Protein | Carbs | Fat |
|---|---|---|---|---|
| Basic Rice Ball (no filling) | 180 kcal | 3 g | 40 g | 0.3 g |
| with Salmon Filling | 220 kcal | 8 g | 40 g | 4 g |
| With Umeboshi Filling | 185 kcal | 3 g | 40 g | 0.3 g |
discover more on cooking perfect Japanese rice to complement your onigiri making journey. For an in-depth history on rice cultivation and its importance in Japanese cuisine, visit Nippon.com.

Q&A
Q&A: Mastering Japanese Onigiri: A Step-by-Step Recipe Guide
Q1: What exactly is onigiri, and why is it so popular in Japan?
A1: Onigiri, often called rice balls, are a beloved japanese snack made from seasoned or salted rice molded into triangular or oval shapes. Their popularity stems from their simplicity, portability, and the comforting balance of flavor and texture. They’re not just food-they’re a cultural icon, often found in convenience stores, lunchboxes, and picnics across Japan.
Q2: What type of rice is best for making authentic onigiri?
A2: Short-grain Japanese rice, also known as sushi rice or Japonica rice, is the best choice. Its sticky texture helps the rice grains cling together,making it easier to shape onigiri without crumbling. Avoid long-grain varieties, which are to fluffy and won’t hold shape well.
Q3: Can I use any filling for onigiri?
A3: Absolutely! Traditional fillings frequently enough include salted salmon, umeboshi (pickled plum), kombu (kelp), or tuna mixed with mayo. The key is to choose fillings that are flavorful,compact,and not too wet,as excess moisture can make the rice soggy and harder to shape.
Q4: How do I keep my hands from sticking while shaping onigiri?
A4: Wetting your hands with water mixed with a pinch of salt is classic and effective. the water prevents rice from sticking,while the salt seasons the rice subtly.Some also wear thin plastic gloves to keep things tidy.
Q5: What’s the secret to shaping perfect triangular onigiri?
A5: It’s all about gentle but firm pressure. Start by scooping a handful of warm rice, place a small portion of filling in the center, then fold the rice around it. Press with your palms and fingers into a triangle-think of it as cradling rather than squishing. Consistency comes with practice!
Q6: Is it essential to wrap onigiri with nori (seaweed)?
A6: While nori adds a wonderful savory flavor and crisp texture contrast, it’s not mandatory. Some onigiri are simply salted rice balls. But wrapping them right before eating helps keep the nori crisp rather than soggy. You can also cut nori into strips or sheets to wrap creatively.Q7: Can onigiri be made ahead of time? How should I store them?
A7: Onigiri are best enjoyed fresh for the optimal texture. If you need to make them ahead, wrap tightly in plastic wrap and refrigerate.Before eating, let them come to room temperature or warm slightly in a microwave.However, avoid prolonged refrigeration to prevent the rice from hardening.
Q8: Are there any fun variations or modern twists on onigiri?
A8: Yes! Some chefs incorporate different grains or season the rice with furikake (rice seasoning) for a burst of umami. Others shape onigiri into cute characters for bento boxes, or grill them lightly to create yaki onigiri-crispy, savory delights perfect for cooler days.
Q9: What kitchen tools can help beginners master onigiri?
A9: While you can perfectly shape onigiri by hand, specialized molds are available that make forming uniform triangles easy. A rice paddle (shamoji) also helps scoop rice without crushing grains. And don’t underestimate the power of a simple bowl of salted water nearby for hand-dipping.
Q10: Why is mastering onigiri a rewarding culinary skill?
A10: Beyond being a delicious snack, mastering onigiri connects you with a centuries-old tradition of Japanese home cooking. It teaches you patience, attention to detail, and how simple ingredients can create something nourishing and lovely.Plus, once you get the hang of it, you can customize endless flavor combinations to suit your taste-a truly personal culinary canvas!
The Conclusion
As you wrap up your journey into mastering Japanese onigiri, remember that this humble rice ball is much more than just a snack-it’s a canvas for creativity and a vessel of tradition. with your newfound skills, you’re not only crafting delicious bites but also honoring centuries of culinary heritage. So next time hunger strikes, let your hands shape comfort, your fillings tell a story, and your onigiri bring a touch of Japan’s heart to your table. Happy rolling!