There’s something undeniably delightful about cake pops-a whimsical swirl of cake and frosting transformed into bite-sized,lollipop-shaped treats that bring a smile with every bite. Whether your preparing for a festive party, a cozy family gathering, or simply craving a fun baking project, cake pops offer the perfect blend of creativity and indulgence. But if the idea of crafting these charming confections feels a bit daunting, fear not. In this beginner’s guide,we’ll unwrap the secrets to mastering cake pops from the very first crumb to the final dip. Get ready to embark on a sweet journey that promises not only delicious results but also endless opportunities to customize and celebrate your baking flair!
Sweet Starts: A Beginner’s Guide to Perfect Cake Pops opens the door to a delightful world where simple ingredients transform into bite-sized marvels of flavor and charm. Crafting the ideal cake pop begins with selecting a cake and frosting duo that marry moisture and taste without sacrificing texture. Whether you lean toward rich chocolate, classic vanilla, or fruity bursts, choosing the right base is crucial to achieving that irresistible bite that beckons for more.
Prep and Cook Time
- Prep Time: 40 minutes
- Cook Time: 25 minutes
- Chilling Time: 1 hour (minimum for binding)
Yield
Approximately 30 cake pops
Difficulty Level
Easy to Medium – perfect for beginners ready to master foundational techniques
Ingredients
- 1 box vanilla cake mix (plus ingredients called for on the box, e.g., eggs, oil, water)
- 1/2 cup cream cheese frosting or your favorite buttercream
- 12 ounces white chocolate or candy melts for coating
- 1 tsp vegetable shortening (optional, for smoother coating)
- Sprinkles, edible glitter, or finely chopped nuts for decoration
- 30 sturdy lollipop sticks
Instructions
- Bake the Cake: Prepare and bake the vanilla cake according to the package directions. Allow it to cool completely on a wire rack; this ensures no excess moisture will water down your binding.
- Crumble the Cake: Onc cooled, crumble the entire cake into a large mixing bowl using your hands or a fork until fine and fluffy. This even texture helps prevent cracks when shaping.
- Bind with Frosting: Add the cream cheese frosting gradually. Start with 1/4 cup and gently fold into the crumbs. Mix just until the cake holds together when pressed; avoid overmixing to maintain tender pops.
- Shape the Pops: Roll the mixture into small, uniform balls (about 1.5 inches diameter). For flawless shaping, use a cookie scoop to portion the cake evenly.Place them on a parchment-lined tray.
- Chill to Set: Insert lollipop sticks halfway into each ball, then refrigerate for at least 1 hour to firm up, which minimizes cracks during coating.
- Prepare the Coating: Melt white chocolate and vegetable shortening together in a microwave-safe bowl in 30-second intervals, stirring regularly until smooth and glossy.
- Coat Each Pop: Dip each chilled cake ball into the melted chocolate, completely covering it. Gently tap the stick against the bowl rim to remove excess coating and prevent thick dripping.
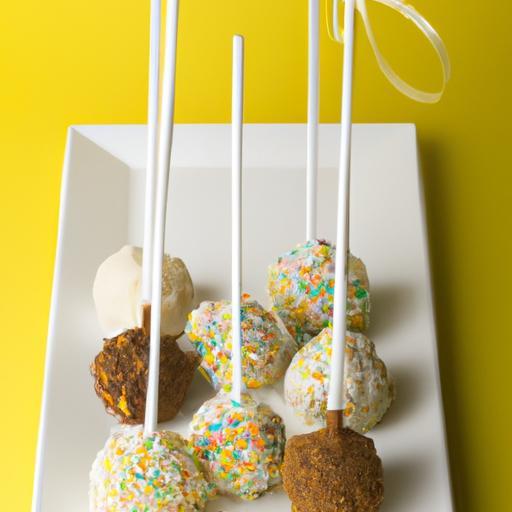
- Decorate Promptly: Before the coating sets, sprinkle your desired toppings to elevate the look and texture. Place the finished pops upright in a styrofoam block or cake pop stand to dry.
Chef’s Notes: tips for Success
- Choosing Cake and Frosting: For moist and crack-free cake pops, dense cakes like pound cake or homemade butter cake are ideal. Avoid very airy cakes or frostings with high liquid content.
- Binding Right: The balance between cake and frosting is delicate-too little frosting causes crumbling; too much creates overly soft pops. Aim for dough-like consistency.
- Preventing Cracks: chill shaped pops thoroughly before dipping and handle the coating gently. Coat with thin layers for smooth finishes and consider adding vegetable shortening to your melting chocolate for a shinier, more fluid coat.
- Make-Ahead: Cake pops can be prepared and frozen before coating. Freeze the shaped balls on parchment, then dip directly from the freezer; allow extra drying time.
serving Suggestions
Present your cake pops elegantly by grouping them in a decorative vase,wrapped in colorful cellophane tied with ribbons,or arranged on a themed cake pop stand. For added flair, drizzle contrasting colors of melted chocolate or dust with edible shimmer powder. These little treats pair perfectly with a cup of richly brewed tea or a glass of chilled lemonade for a sweet and stylish party centerpiece.

| nutrient | Per Cake Pop (approx.) |
|---|---|
| Calories | 160 kcal |
| Protein | 2 g |
| Carbohydrates | 22 g |
| Fat | 7 g |
Looking to deepen your baking expertise? Explore our detailed guide on Mastering Buttercream Frosting Techniques to polish your sweet skills. For ingredient science, the Encyclopaedia Britannica on Baking offers an excellent foundation on how each component impacts texture and flavor.
Q&A
Q&A: Sweet Starts – A Beginner’s Guide to Perfect Cake Pops
Q1: What exactly are cake pops,and why are they so popular?
A1: Cake pops are delightful little bites of cake,shaped into spheres,attached to sticks,and frequently enough coated in a smooth layer of chocolate or candy melts.They’re popular as they combine the best parts of cake and candy in an endlessly customizable, bite-sized treat that’s perfect for parties, gifting, or just a sweet indulgence.Q2: what’s the first step in making cake pops for beginners?
A2: Start with baking a simple cake using your favorite recipe or a box mix for convenience. Once baked and cooled,crumble the cake into fine crumbs. This foundation is essential because it mixes with frosting to form the perfect dough-like consistency needed to shape your pops.
Q3: how do you ensure cake pops hold their shape without falling apart?
A3: The secret lies in the balance between cake crumbs and frosting. too much frosting makes the mixture too soft, while too little won’t bind the crumbs properly. A good rule of thumb is to add frosting bit by bit until the mixture holds together when pressed but isn’t overly sticky. Chilling the formed balls in the fridge helps solidify their shape before dipping.
Q4: What are some tips for coating cake pops evenly without cracking?
A4: first, ensure your coating (chocolate or candy melts) is fully melted and smooth – a thin, consistent texture coats better. Dip the entire cake ball slowly and tap off excess gently. Avoid cooling pops in the fridge immediately after dipping, as rapid temperature changes can cause cracking. Instead, let them set at room temperature or in a cooler spot away from drafts.
Q5: Can cake pops be customized for special occasions?
A5: Absolutely! Cake pops are blank canvases perfect for creativity. You can add sprinkles, edible glitter, colored drizzle, or themed decorations. Using different cake and coating colors lets you match any occasion – from birthdays to holidays or even just everyday fun.
Q6: How should cake pops be stored to keep them fresh longest?
A6: Once fully set,store cake pops in an airtight container. They’re best enjoyed within 2-3 days at room temperature. For longer storage, keep them in the refrigerator, but be sure to bring them back to room temperature before serving, so flavors and textures shine.
Q7: What are some beginner-amiable flavor combinations to try?
A7: Classic vanilla cake with white chocolate coating is a safe starter. chocolate cake with a rich milk chocolate shell is a favorite too.Mix in fun frosting flavors like cream cheese or peanut butter for an extra twist. For a refreshing touch, try lemon cake with a tangy white chocolate coating.
Q8: Any advice for working with kids to make cake pops together?
A8: cake pops make a fantastic hands-on activity! Kids can help crumble the cake, roll the balls, decorate with sprinkles, and even taste-test. Just supervise the dipping step involving melted coatings, as it gets hot. Creativity and messiness are part of the fun – embrace both!
Q9: what common mistakes should beginners avoid?
A9: Overmixing the cake and frosting can create a dense, too-soft mixture, making shaping tricky. Also, don’t rush the drying process – premature handling can cause cracks or fallen pops. Lastly, using too thick or too cool coating can lead to uneven coverage. Patience and gentle hands are your best allies.
Q10: How can I make my cake pops look professionally finished?
A10: Use quality candy melts or couverture chocolate for smooth coatings. Use a rotating stand or stick holder to let pops dry upright evenly. Employ piping bags for delicate drizzle designs and invest in edible decorations like pearls or themed toppers. with practice, your cake pops will look as good as they taste!
In Retrospect
whether you’re gifting them at a party, adding a charming touch to afternoon tea, or simply indulging your sweet tooth, cake pops offer a delightful canvas for creativity and flavor. With this beginner’s guide, you now have the sweet foundation to experiment, decorate, and perfect your very own bite-sized treats. Remember, the magic of cake pops lies not just in their taste, but in the joy of crafting each one with care. So grab your sticks, gather your favorite flavors, and let your sweet journey begin-because every perfect cake pop starts with a little love and a sprinkle of patience. Happy dipping!